Using Pico-2's BIOS interface, you can program Pico-2 for various purposes. The example below is to show a binary counter (incremented every 0.1s) on Pico-2's LEDs.
 1: #include "sh7046f.h"
 2: #include "bios.c"
 3:
 4: uint  count = 0;
 5:
 6: int  main (void)
 7: {
 8:     void  every100ms();
 9:
10:     LED_init();
11:     CMT0_init(3, 4799, every100ms);
12:
13:     set_imask(0);
14:     for (;;) {}
15: }
16:
17: void  every100ms (void)
18: {
19:     count++;
20:     LED_set(count & 0x1f);
21: }
As this example illustrates, you need to begin your program with including two files, namely sh7046.h and bios.c, which are included in MakeBox downloadable below. The functions LED_init(), LED_set(), and CMT0_init() are BIOS functions defined in bios.c. Note that set_imask(0) enables interruptions (in this case, the one by CMT0 timer), and the following infinite loop will be catching the interruption.
We use gcc (GNU C Compiler) for compiling Pico-2 programs. Here is an example of making binutils-2.20, gcc-4.2.4, and newlib-1.17.0 on Linux and Mac OS X. Note that you need to build a cross compiler whose target is sh-elf.
unix$ tar xvf binutils-2.20.tar
unix$ cd binutils-2.20
unix$ ./configure --target=sh-elf
unix$ make
unix$ sudo make install
unix$ tar xvf gcc-4.2.4.tar
unix$ tar xvf newlib-1.17.tar
unix$ cd gcc-4.2.4
unix$ ln -s ../newlib-1.17.0/newlib newlib
unix$ ./configure --target=sh-elf --enable-languages="c" --enable-libssp=no ---with-newlib
unix$ make
unix$ sudo make install
MakeBox, downloadable below, is a folder contains everything you need to compile your Pico-2 program. You need to rewrite (or replace) userprog.c in the folder for your purpose, and modify the PROG variable in the Makefile as well.
- Download: MakeBox with a sample program
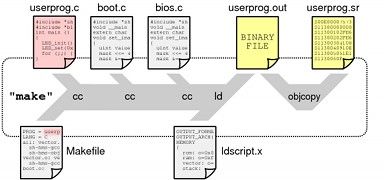
To compile your Pico-2 program, just type "make" in the MakeBox. The internal process of this compilation is illustrated below. At the end, it produces an object file (userprog.sr), which will then be baked into the flash memory on the Pico-2.
The flash meory writer, downloadable below, can be compiled and used on Linux, Mac OS X, and Windows. You need to build two sets of programs, namely pico-flash (Pico-2 program for flash-memory writing) and pc-flash (PC program for transferring object files).
- Download: Flash memory writer
For baking your Pico-2, the first thing you need is to boot the Pico-2 in BOOT mode. Having SW6 and SW7 set ON, power your Pico-2 (or reset it manually); then your Pico-2 will be in BOOT mode, ready to download the Pico-2 program from your PC and store in its RAM. We here transfer a Pico-2 program for flash-memory writing, namely pico-flash.sr.
unix$ pc-boot --dev /dev/ttyS0 pico-flash.sr
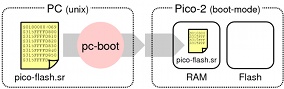
Now your Pico-2 is executing pico-flash.sr (on its RAM), so you can transfer your Pico-2, which will then be baked into your Pico-2's flash memory.
unix$ pc-flash --dev /dev/ttyUSB0 ../makebox/userprog.sr
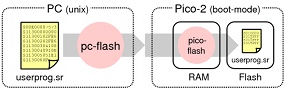
Now your program is baked into your Pico-2's flash memory. Do not forget to put SW6 and SW7 back to OFF. After reset, your Pico-2 will run your new program (userprog.sr) automatically.